The quest for the perfect, velvety-smooth homemade hummus often feels like chasing a culinary unicorn. While store-bought versions offer convenience, they rarely capture the vibrant freshness and unparalleled creaminess of a truly authentic, kitchen-crafted batch. If you've ever dreamt of dipping warm pita into a hummus so luxurious it practically melts in your mouth, you've come to the right place. This guide will unlock the secrets to mastering an ultra-creamy homemade hummus, elevating your snack game and delighting your taste buds with every scoop.
Hailing from the ancient culinary traditions of the Levant, hummus isn't just a dip; it's a cultural cornerstone, a symbol of hospitality and nourishment that has transcended borders. Its global popularity today is a testament to its simple yet profound deliciousness, rich in protein, fiber, and healthy fats. But beyond its nutritional profile, the real magic lies in its texture – a delicate balance of earthy chickpeas, pungent garlic, bright lemon, and nutty tahini, all whipped into an ethereal, spreadable delight. Forget grainy, thick pastes; we're aiming for a dip that's light, airy, and exquisitely smooth.
The Essential Building Blocks of Authentic Hummus
To craft an extraordinary hummus, you must start with extraordinary ingredients. Each component plays a vital role in achieving that coveted balance of flavor and texture. Think of them as a symphony, where each instrument contributes to the harmonious whole.
- Chickpeas (Garbanzo Beans): The foundation of any good hummus. While canned chickpeas are convenient, dried chickpeas, properly prepared, yield a superior texture and flavor. They become incredibly tender, almost custardy, which is crucial for a smooth final product.
- Tahini: This creamy sesame seed paste is arguably the most critical ingredient for achieving authentic flavor and that signature richness. Good quality tahini should be light in color, pourable, and have a mild, slightly bitter, nutty taste. Poor quality tahini can make your hummus bitter or chalky.
- Fresh Lemon Juice: Freshly squeezed lemon juice brightens the dip, cuts through the richness of the tahini, and helps with emulsification. Bottled lemon juice simply won't deliver the same zing.
- Garlic: Raw garlic provides a pungent, aromatic kick. The amount is a matter of personal preference, but don't shy away from it – it's key to hummus's distinctive flavor profile.
- Salt: Essential for enhancing all the other flavors. Season gradually and taste as you go.
- Olive Oil: While often a garnish, a drizzle of good quality extra virgin olive oil during blending can add a beautiful depth of flavor and richness.
- Aquafaba (Chickpea Cooking Liquid): Often overlooked, this starchy liquid is a secret weapon. It helps bind the ingredients, promotes emulsification, and allows you to adjust the consistency without diluting the flavor.
Selecting Your Ingredients Wisely
For the ultimate creamy hummus, invest in the best tahini you can find. Look for brands that are 100% sesame, light in color, and smooth in consistency. When it comes to chickpeas, while canned ones can work in a pinch (rinse them thoroughly), dried chickpeas offer a far superior texture. They allow for the magical baking soda trick that transforms them into silken gems.
The Journey to Silky Smoothness: Preparation Secrets
The real difference between good hummus and exceptional hummus lies in the preparation of the chickpeas and the blending technique. This is where we unlock the "ultra creamy" potential.
- Soaking Dried Chickpeas: If using dried chickpeas, soak them in plenty of cold water for at least 12 hours, or up to 24-48 hours. Soaking softens the skins and reduces cooking time, making them easier to digest and mash.
- The Baking Soda Revelation: This is a game-changer. After soaking, drain and rinse the chickpeas. Place them in a large pot, cover with fresh water, and add about 1 teaspoon of baking soda for every cup of dried chickpeas. The baking soda helps to break down the pectin in the chickpea skins, making them incredibly tender and ensuring a super smooth texture.
- Cook Until Extremely Tender: Bring the chickpeas to a boil, then reduce heat and simmer for 1 to 2 hours, or until they are literally falling apart when pressed between your fingers. They should be softer than you think they need to be. Skim off any foam that rises to the surface.
- Save the Aquafaba: Once cooked, drain the chickpeas, reserving at least 1 cup of the cooking liquid (aquafaba). This liquid is invaluable for achieving the perfect creamy consistency.
- The Peeling Trick (Optional, but Recommended for Ultra-Smoothness): For the absolute silkiest hummus, consider peeling the skins off the cooked chickpeas. This can be tedious, but the baking soda method makes them much easier to remove. Simply rub the cooked chickpeas between your palms under running water, and the skins will slip right off. This step is what many Middle Eastern restaurants do to get their signature texture.
- Blending for Perfection:
Combine the cooked (and optionally peeled) chickpeas, tahini, freshly squeezed lemon juice, minced garlic, and salt in a high-speed blender or food processor. Begin blending. The mixture will initially be thick and pasty.
Gradually add the reserved aquafaba, a tablespoon at a time, while the machine is running. The aquafaba, rich in proteins and saponins, is crucial for emulsifying the tahini's oils with the other ingredients, preventing a grainy or separated texture. It also incorporates air, making the hummus light and airy rather than dense.
Continue blending for several minutes – often 3-5 minutes or even longer – scraping down the sides as needed. Patience here is key! You want to break down all the chickpea fibers and whip air into the mixture until it's incredibly smooth, light, and almost fluffy. Adjust the consistency with more aquafaba until it reaches your desired creaminess.
Flavor Balancing, Serving, and Storage
Once your hummus has achieved that perfect, ethereal texture, it's time for the final touches.
Taste and Adjust
Never skip this step! Taste your hummus and adjust the seasonings as needed. Does it need more salt? A little more lemon for brightness? Perhaps another clove of garlic for a bolder flavor? Don't be afraid to experiment to find your ideal balance.
Serving Your Masterpiece
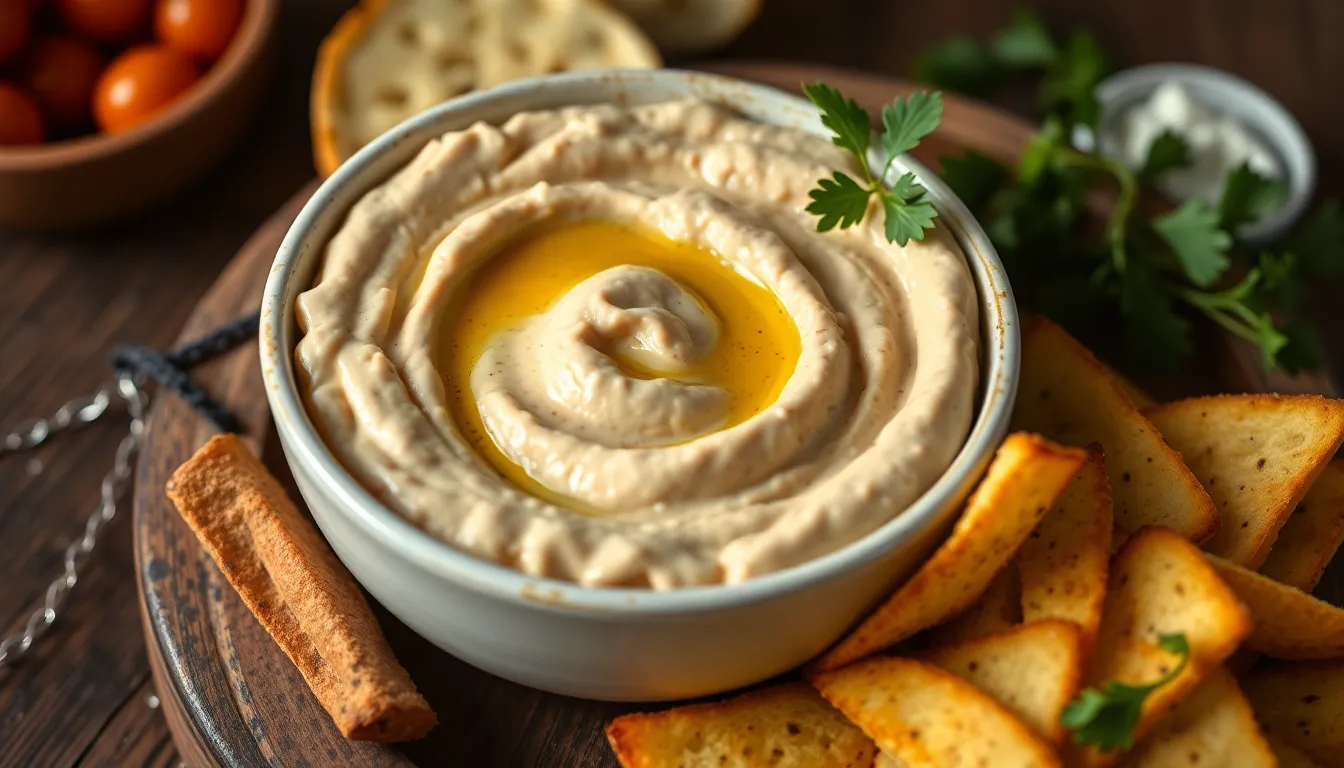
Transfer your freshly made hummus to a shallow bowl. Create a small well in the center with the back of a spoon and generously drizzle with good quality extra virgin olive oil. For an extra flourish, sprinkle with a pinch of paprika, sumac, or fresh chopped parsley. Some also love a dash of cumin for an earthy note.
Hummus is incredibly versatile. It's traditionally served with warm pita bread, but it's also fantastic with crunchy fresh vegetables like carrots, cucumbers, and bell peppers. Use it as a spread in sandwiches and wraps, a topping for salads, or even alongside grilled meats and falafel. Its versatility makes it a perfect appetizer for parties or a healthy everyday snack.
Storage and Food Safety
Homemade hummus, with its fresh ingredients, is best enjoyed within a few days. Store it in an airtight container in the refrigerator. Due to its perishable nature, hummus should not be left at room temperature for more than 2 hours (or 1 hour if the temperature is above 90°F/32°C). Always refrigerate promptly to maintain its freshness and safety.
Beyond the simple satisfaction of a delicious meal, understanding hummus also connects us to a rich history. Hummus is not just a dish; it's a cultural icon, a staple that has transcended its Levantine origins to become a global phenomenon. To understand its rich history and the debates surrounding its identity, explore our article: Hummus: A Levantine Legacy, Cultural Disputes, and Global Popularity. From ancient chickpea cultivation to a multi-billion dollar industry, the story of hummus is fascinating. Learn more about its journey: From Ancient Chickpea to Global Billion-Dollar Market: The Story of Hummus.
Conclusion
Making your own hummus from scratch is a rewarding culinary endeavor that promises a dip far superior to anything you'll find in a grocery store. By following these simple yet crucial steps – especially the emphasis on overcooking your chickpeas and using aquafaba for emulsification – you'll unlock the secrets to an ultra-creamy, authentic hummus that will impress everyone who tries it. So, roll up your sleeves, embrace the process, and prepare to indulge in the silkiest, most flavorful homemade hummus you've ever tasted. Enjoy your culinary creation!
